Claim Your $ALMANAK Airdrop
The $ALMANAK airdrop claim period has ended. Unclaimed tokens can no longer be claimed. The information below is kept for reference only.
Overview
Eligible users can now claim their $ALMANAK airdrop directly through the Claim page in the Almanak dashboard. During this process, you can either claim and stake your allocation to earn rewards, or claim without staking (forfeiting rewards).
To complete the claim, you will need an Almanak Wallet on Ethereum. If you don’t have one, you will create it during the claim flow.
The full process takes only a few moments and requires signing on-chain transactions. To claim your airdrop, navigate to the Claim page in the Almanak dashboard and press Claim Your Tokens.
Claiming & Staking Your Airdrop
Step-by-step process
-
Press Claim
You will now configure your staking parameters.
-
Select the Stake Amount & Stake Duration
Choose how much of your airdrop you want to stake and for how long. Staking increases your rewards.
-
Press Select Wallet
You will choose or create the wallet where your tokens will be claimed and staked from.
-
Press Create Wallet
- If you already have an Almanak Wallet on Ethereum that you want to use, select that wallet and skip to Step 6.
- Alternatively, press Add New Wallet to create a new one.
-
Name your wallet and press Create Wallet
A wallet deployment transaction will be generated for you to sign.
-
Press & Hold to claim and stake your allocation
Once the final transaction is confirmed, your tokens will be claimed and staked according to your selections.
That's it! Feel free to flex on X.
Here's a video of the Claim & Stake process on Sepolia (for preview):
Claiming Without Staking (Forfeiting Rewards)
If you prefer to simply claim your airdrop without staking and forfeiting your rewards, follow these steps instead.
Step-by-step process
-
Press Claim
-
Press I want to claim everything
This option claims your allocation without staking.
-
Confirm your choice by pressing Claim and Forfeit Rewards
You will proceed without receiving staking rewards.
-
Press Create Wallet
- If you already have an Almanak Wallet on Ethereum you'd like to use, select that wallet and skip to Step 6.
- Otherwise, press Add New Wallet to create a new one.
-
Name your wallet and press Create Wallet
Sign the wallet deployment transaction when prompted.
-
Press Confirm Claim (No Rewards)
This final transaction confirmation will complete your claim.
Here's a video of the Claim process on Sepolia (for preview):
Having issues? Claim through Etherscan
If you're having issues with the claim process, you can claim through Etherscan.
- If you Pre-Staked, open these two tabs:
- The Almanak Prestake Airdrop contract on Etherscan.
- The airdrop proof. Insert your lowercase wallet address in this url: https://storage.googleapis.com/airdrop-recipients/prestakers/YOUR_LOWERCASE_WALLET_ADDRESS.json
- If you didn't pre-stake, open these two tabs:
- The Almanak Airdrop contract on Etherscan.
- The airdrop proof. Insert your lowercase wallet address in this url: https://storage.googleapis.com/airdrop-recipients/normal/YOUR_LOWERCASE_WALLET_ADDRESS.json
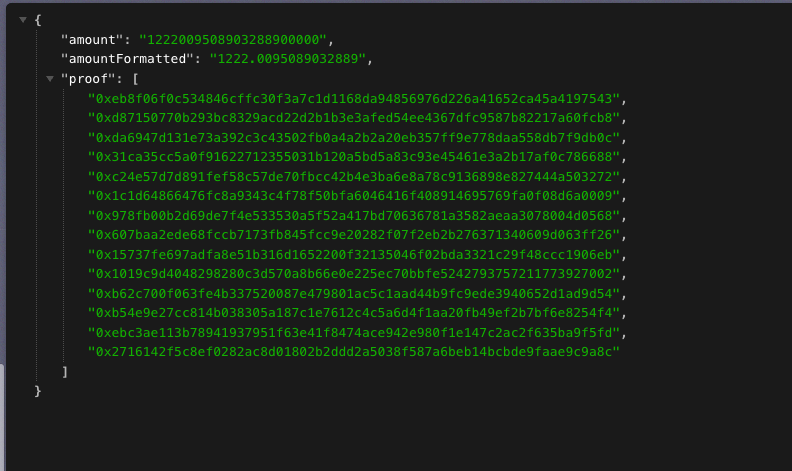
Confirm that on the proofs page, you should see something similar to this (or formatted differently):
- On Etherscan, click on the "Connect to Web3" button and connect your wallet.
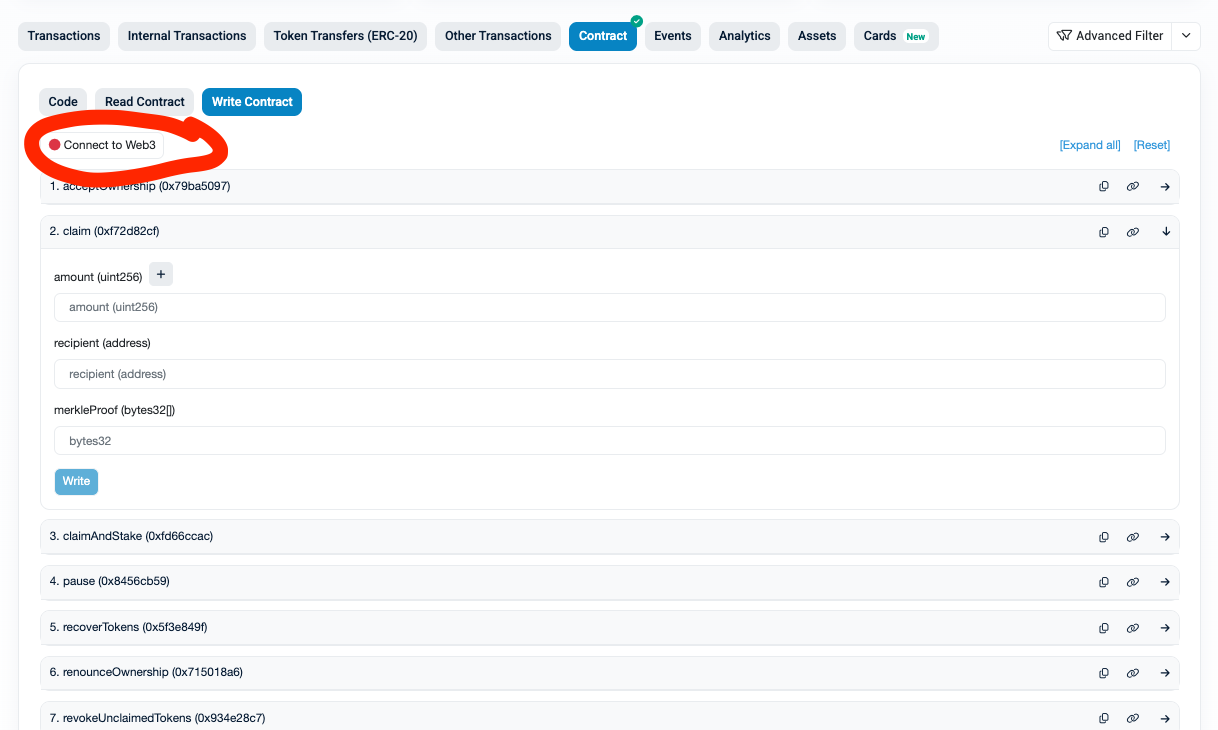
- Fill out the
claimform:- For the amount field, copy the
amountfield (not theamountFormattedfield!) from your airdrop proof in the other tab. - For the recipient field, paste your own wallet address.
- For the merkleProof field, copy the "proof" field from your airdrop proof in the other tab. Make sure to copy the entire array with all values, and remove the quotes and spaces. Example:
[0x6399c093b5cdd8891f4a84406da5bf04713c36637e3129c3eba993547bafba6f,0x98cecdd5deb10edf0a62930d1d089379c41514d09f41b8a248a9cad010322819,0xa26fea22b8e3a7a169a7283f2b19274b860282ffa95049593285863cdb260ed2,0xccfa2fe0eb86c383dc753254b43fdf0dfba580b3c589c64b94886c0c8d15fe49,0xbe370014d09555d999f4452bbaf1a2b5d7af74608aefe2764190083f8b87c6cd,0xa581621ea702627f217e22c362ee8e1ed865ae8d557e7edafcaa2b42fe88b940,0xe293b1d4ee20954a11ec3ced88ba50381d164ab4703ad2bc8a4db5efd8ddf2ed] - For the amount field, copy the
- Verify you've connected your wallet, and click on the "Write" button to sign the transaction.
- Sign the transaction with your wallet.
- Click the "View Transaction" button to verify the transaction went through. You now have the Almanak tokens in your wallet.